# AWS IOT Core
AWS IoT Core provides the cloud services that connect your IoT devices to AWS cloud services. AWS IoT provides device software that can help you integrate your IoT devices into AWS IoT-based solutions. If your devices can connect to AWS IoT Core, AWS IoT Core can connect them to the Console or Cloud services that AWS provides.
# Registering Devices through Radio Bridge
The easiest way to add devices is to let Radio Bridge register them for you. In this scenario, you don’t need your own AWS account or a direct engagement with AWS.
- Simply log into the Radio Bridge console and add your Multitech gateway first and follow the instruction below to configure that.
- Once done select the Devices tab on the left side of the page and click “Add New Device”. From there select the AWS icon and then “Register through Radio Bridge”. Once the device has been added, your Radio Bridge sensors will connect through the AWS network and you will see new messages appear in the console.
# Add Your Multitech Conduit Gateway
You can register your gateway using Radio Bridge, so that your devices can communicate securely with Console. Note that this section describes adding your gateway through Radio Bridge and not with your own account (which is described in the next section).
Go to the Gateways tab on the left, click Add New Gateway, and select the "AWS IoT Core". You can follow the prompts to finish the gateway registration.
Once registration will be done, you will see the Gateway details popup, that contains gateway status and certificate download links to configure the Multitech Gateway. Next steps show the Gateway installation procedure.
For a detailed Multitech Conduit configuration guide, please click here (opens new window)
# Configure Gateway Certificate
- Open a web browser and enter the device’s default ip address http://192.168.2.1
- A security window will open, click on the Advanced button to bypass, then click on “Proceed to 192.168.2.1”
- If this is the first time you're configuring the Gateway then please refer to the Section 4 - Setup the Gateway (opens new window)
# LoRa and Basic Station Configuration:
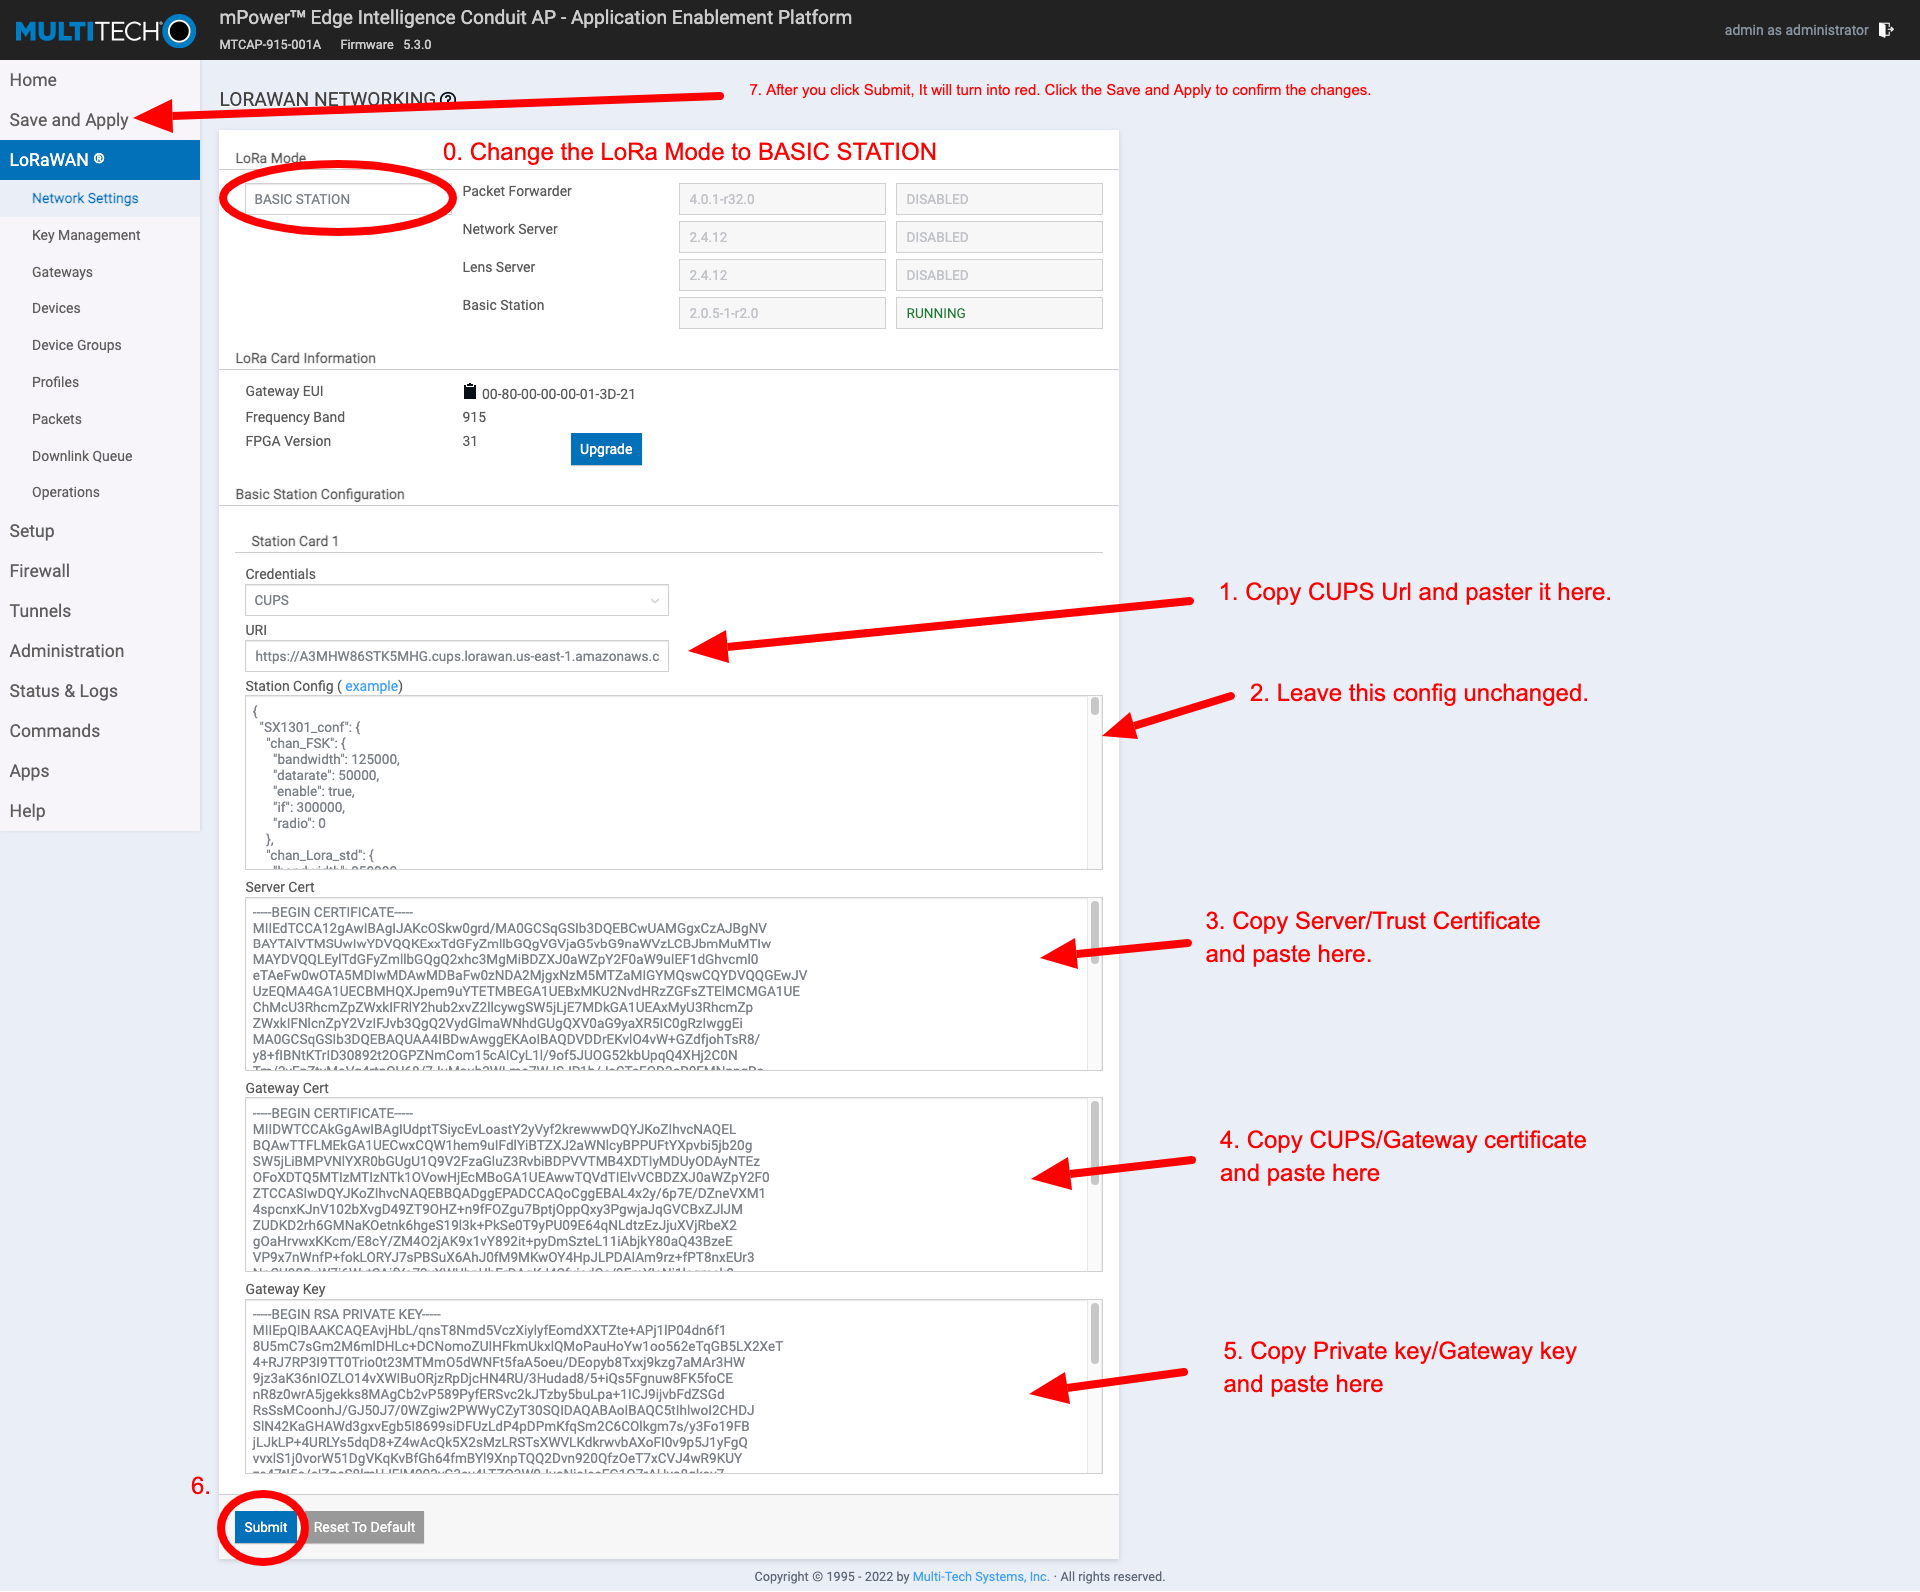
- To setup basic station select "LoRaWAN" on the main UI then "Network Settings" (this should be the default).
- Change the "Mode" combobox to "BASIC STATION". The fields on this page now correspond to each of the files that Basic Station needs to initiate a connection (more information about this can be found in the Semtech Basic Station documentation at https://doc.sm.tc/station/)
- Credentials: set it to “CUPS”. (AWS uses CUPS authentication, not LNS. You can read more about LNS and CUPS here https://doc.sm.tc/station/credentials.html#files-types)
- URI: URI of the network server. Copy the CUPS url from the Gateway Detail Popup.
- Station config: This is the same as a Semtech UDP packet forwarder file. Use the example file from the UI already populated for you.
- Server Cert: Copy and paste the Server/Trust certificate from console into this field, Please check reference image to see where the copy buttons are located.
- Gateway Cert: Copy and paste the CUPS/Gateway certificate from console into this field.
- Gateway Key: Copy and paste the CUPS Private Key/Gateway Key from console into this field.
- After filling each of the fields click “Submit” at the bottom of the page.
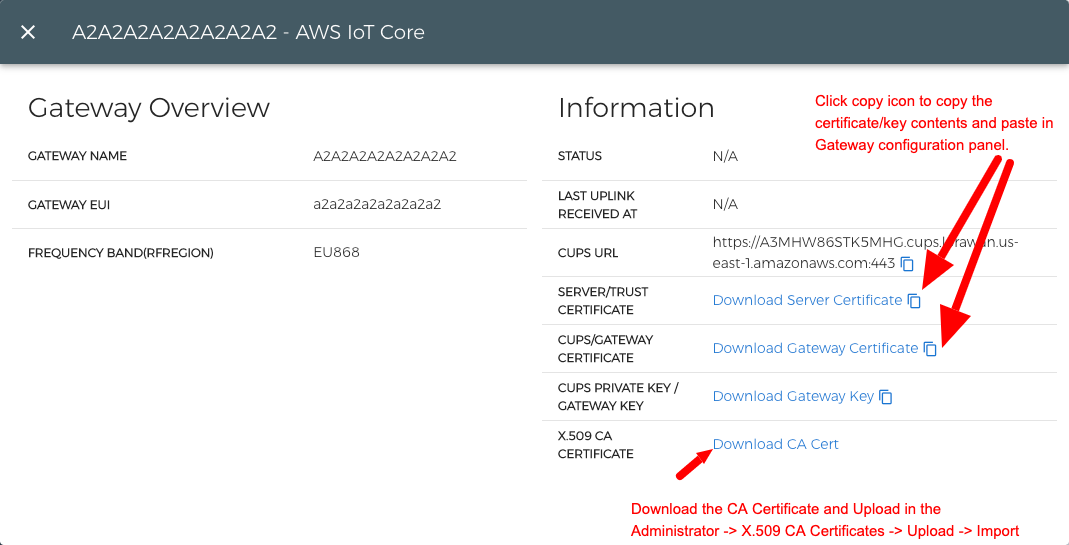
- Now you need to upload the CA Certificate, Click "Administration" on the main UI then "X.509 CA Certificate"
- Click "Choose File" and select the downloaded "CA Certificate" file from console.
- Click "Import"
- Once import finishes then click "Save and Apply"
- Wait for 2-3 Mins to restart the gateway and connect to AWS network.
# Connection error Debugging
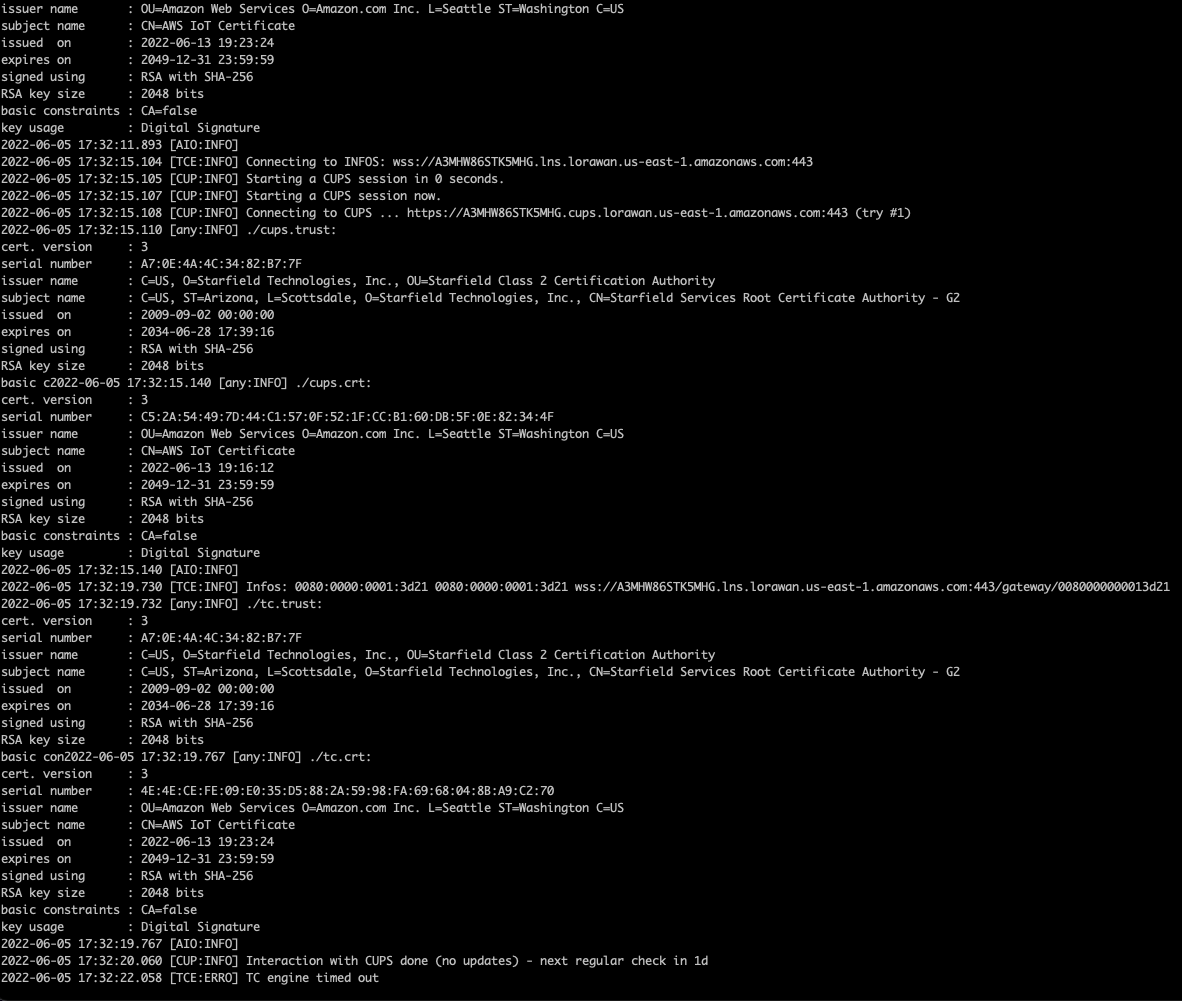
- If due to some reason Gateway doesn't show online then login into your gateway via SSH.
- Type following commands, whenever asked for password enter the login password.
- sudo -s
- cd /var/run/lora/1
- ./station
- If there will be any error, you will see on screen. However, a successful response looks like below screenshot.
# Add Devices to Console
Select the Devices tab on the left side of the page and click “Add New Device”. From there select the "AWS IoT Core" icon and then “Register through Radio Bridge”. Once the device has been added, you need to add the device(s) in your Multitech gateway.
# Add App Keys on your Gateway
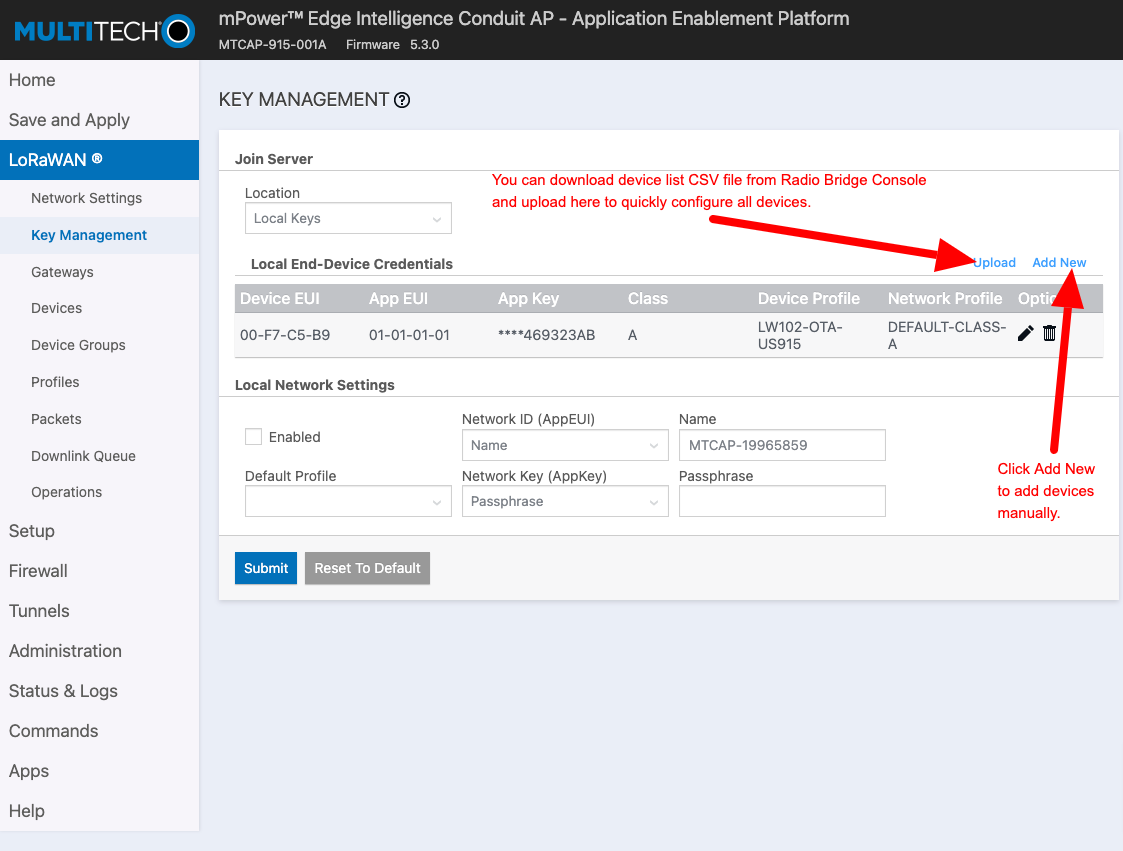
- Login into Multitech Conduit gateway configuration portal. http://192.168.2.1
- Navigate to LoRaWAN --> Key Management
- You can click on Add New and fill the form manually Or Download the App keys from Radio Bridge Console.
- In a new tab, Navigate to Radio Bridge Console --> Devices
- Filter the devices based on network and click download button to get CSV file.
- Upload the CSV file on Multitech gateway configuration page and click "Submit".
Your Radio Bridge sensors will connect through the AWS IoT Core network, and you will see new messages appear in the console.
Note: On initial Gateway installation, it might take 5-10 Mins for the CUPS endpoint to connect and update the gateway. So you need to wait for few mins to see the first message on Console.
# Using Your AWS Account
If you are planning to use your own AWS account, this section shows how to link your AWS Account to the Radio Bridge Console.
# Preparation
- Setup Roles and Permissions in your AWS Account
- Login to your AWS account.
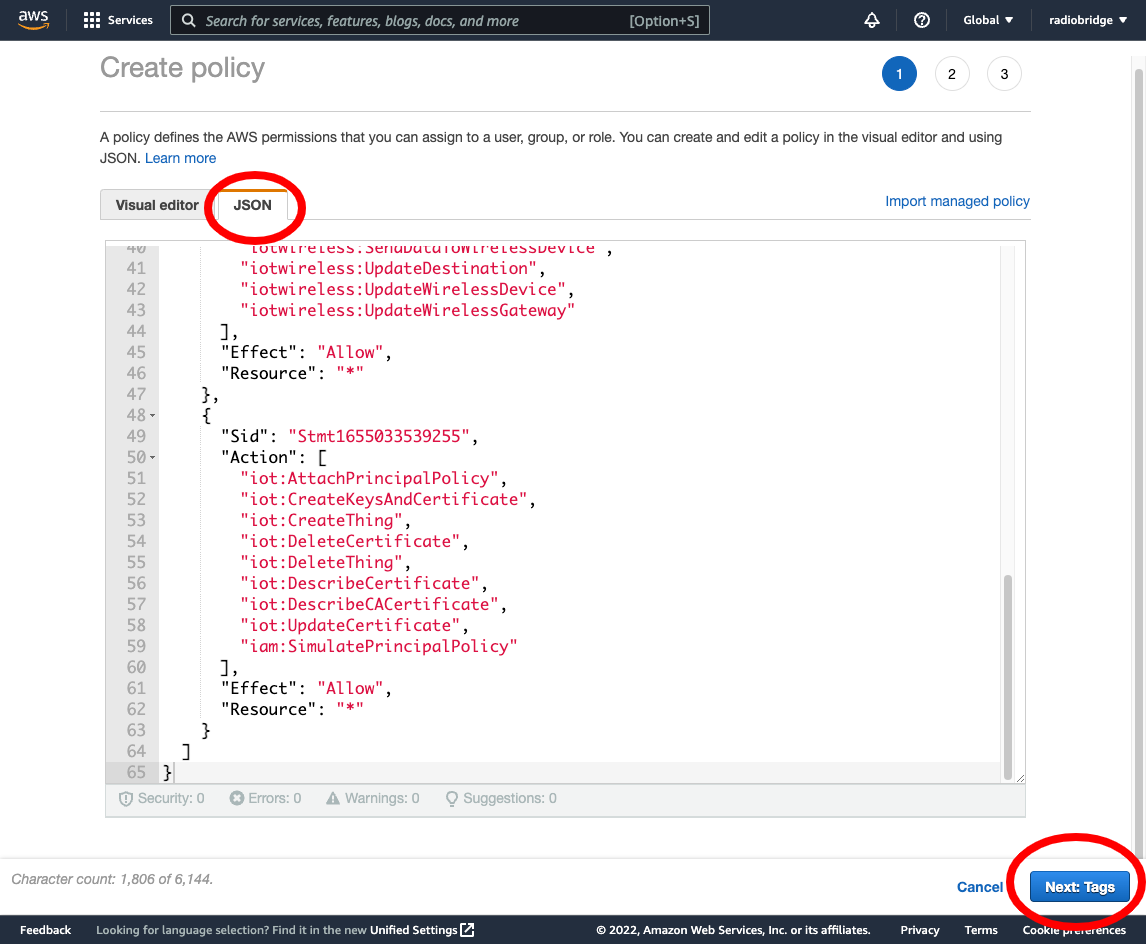
- Navigate to IAM Service, Click "Policies" from the left menu.
- Click Create Policy, Toggle the tab to JSON and enter following JSON.
{
  "Version": "2012-10-17",
  "Statement": [
    {
      "Sid": "Stmt1655030748773",
      "Action": [
        "iotwireless:AssociateWirelessDeviceWithThing",
        "iotwireless:AssociateWirelessGatewayWithCertificate",
        "iotwireless:AssociateWirelessGatewayWithThing",
        "iotwireless:CreateDestination",
        "iotwireless:CreateDeviceProfile",
        "iotwireless:CreateServiceProfile",
        "iotwireless:CreateWirelessDevice",
        "iotwireless:CreateWirelessGateway",
        "iotwireless:DeleteDestination",
        "iotwireless:DeleteDeviceProfile",
        "iotwireless:DeleteQueuedMessages",
        "iotwireless:DeleteServiceProfile",
        "iotwireless:DeleteWirelessDevice",
        "iotwireless:DeleteWirelessGateway",
        "iotwireless:DisassociateWirelessDeviceFromThing",
        "iotwireless:DisassociateWirelessGatewayFromCertificate",
        "iotwireless:DisassociateWirelessGatewayFromThing",
        "iotwireless:GetDestination",
        "iotwireless:GetDeviceProfile",
        "iotwireless:GetServiceEndpoint",
        "iotwireless:GetServiceProfile",
        "iotwireless:GetWirelessDevice",
        "iotwireless:GetWirelessDeviceStatistics",
        "iotwireless:GetWirelessGateway",
        "iotwireless:GetWirelessGatewayCertificate",
        "iotwireless:GetWirelessGatewayFirmwareInformation",
        "iotwireless:GetWirelessGatewayStatistics",
        "iotwireless:ListDestinations",
        "iotwireless:ListDeviceProfiles",
        "iotwireless:ListQueuedMessages",
        "iotwireless:ListServiceProfiles",
        "iotwireless:ListWirelessDevices",
        "iotwireless:ListWirelessGateways",
        "iotwireless:SendDataToWirelessDevice",
        "iotwireless:UpdateDestination",
        "iotwireless:UpdateWirelessDevice",
        "iotwireless:UpdateWirelessGateway"
      ],
      "Effect": "Allow",
      "Resource": "*"
    },
    {
      "Sid": "Stmt1655033539255",
      "Action": [
        "iot:AttachPrincipalPolicy",
        "iot:CreateKeysAndCertificate",
        "iot:CreateThing",
        "iot:DeleteCertificate",
        "iot:DeleteThing",
        "iot:DescribeCertificate",
        "iot:DescribeCACertificate",
        "iot:UpdateCertificate",
        "iot:CreateTopicRule",
        "iot:CreateTopicRuleDestination",
        "iot:ListTopicRuleDestinations",
        "iot:UpdateTopicRuleDestination"
      ],
      "Effect": "Allow",
      "Resource": "*"
    },
    {
      "Sid": "Stmt165589635452",
      "Action": [
        "iam:AttachRolePolicy",
        "iam:CreatePolicy",
        "iam:CreateRole",
        "iam:GetPolicy",
        "iam:GetRole",
        "iam:GetRolePolicy",
        "iam:ListPolicies",
        "iam:PutRolePolicy",
        "iam:UpdateRole",
        "iam:SimulatePrincipalPolicy"
      ],
      "Effect": "Allow",
      "Resource": "*"
    },
    {
      "Sid": "Stmt165589321452",
      "Action": [
        "iam:PassRole"
      ],
      "Effect": "Allow",
      "Resource": "*",
      "Condition": {
        "StringEquals": {
          "iam:PassedToService": "iotwireless.amazonaws.com"
        }
      }
    }
  ]
}
- Click "Next: Tags", then click "Next: Review", Enter the policy name as "Console_Iot_Core_Policy"
- Click "Create Policy" to create the policy.
# Generate Access Key ID and Secret
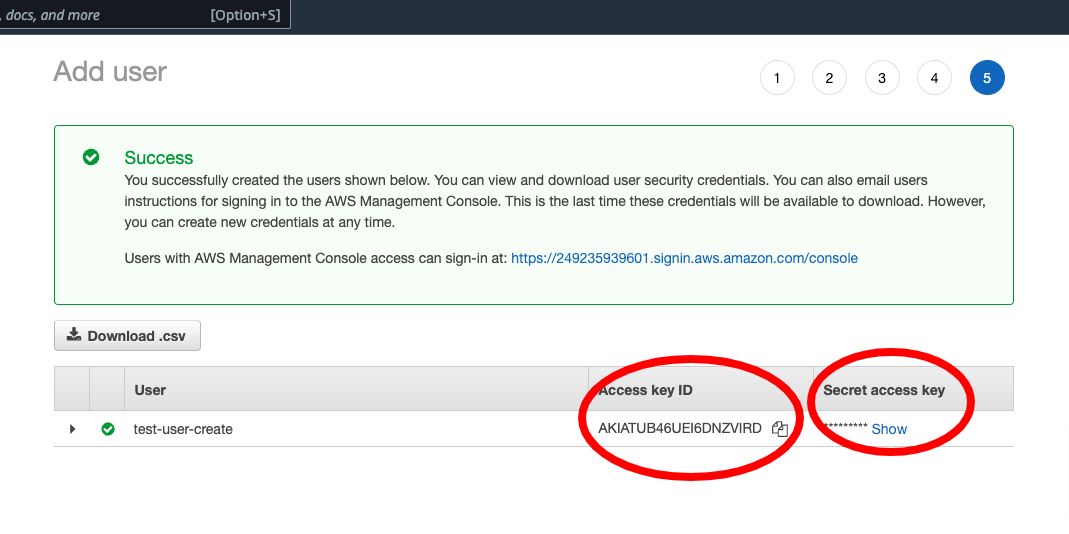
- Navigate to the IAM --> Users, Click "Add users"
- Enter a "username", AWS access type will be "Access key - Programmatic access"
- Click "Next Permissions", Click "Attach existing policies directly"
- Search for "Console_Iot_Core_Policy" in the list and select that, Click "Next: tags", again click "Next: Review"
- Click "Create user" to create the user.
- You will see Access key ID and Secrets on the successful screen as shown below. Make sure to copy the Secret or download the CSV as it's revealed only on this screen.
# Setup Device Profile, Service Profile
AWS IoT Core for LoRaWAN supports device profiles and service profiles. Device profiles contain the communication and protocol parameter values the device needs to communicate with the network server. Service profiles describe the communication parameters the device needs to communicate with the application server.
Some pre-defined profiles are available for device and service profiles. Before proceeding, verify that these profile settings match the devices you will be setting up to work with AWS IoT Core for LoRaWAN.
- Navigate to the AWS IoT Core console. In the navigation pane, choose LPWAN Devices.
- In the navigation pane, choose Profiles
- In the Device Profiles section, there are some pre-defined profiles listed.
- Check each of the profiles to determine if one of them will work for you.
- If not, select Add device profile and set up the parameters as needed. For US 915 as an example, the values
are:
- MacVersion 1.0.3
- RegParamsRevision RP002-1.0.1
- MaxEirp 10
- MaxDutyCycle 10
- RfRegion US915
- SupportsJoin true
- Continue once you have a device profile that will work for you.
- In the Service Profiles section, there are some pre-defined profiles listed. Check each of the profiles to determine if one of them will work for you.
- If not, select Add service profile and set up the parameters as needed. As an example, the default service
profile parameters are shown below. However, only the AddGwMetadata setting can be changed at this
time.
- UlRate 60
- UlBucketSize 4096
- DlRate 60
- DlBucketSize 4096
- AddGwMetadata true
- DevStatusReqFreq 24
- DrMax 15
- TargetPer 5
- MinGwDiversity 1
Note: Referenced from Multitech getting started guide (opens new window)
# Setup destination
Destination setup will allow you to forward the messages from AWS IoT Core to console. A destination consists of a Rule and a Role. To set up the destination:
- Navigate to the AWS IoT Core console. In the navigation pane, choose LPWAN Devices, and then Destinations
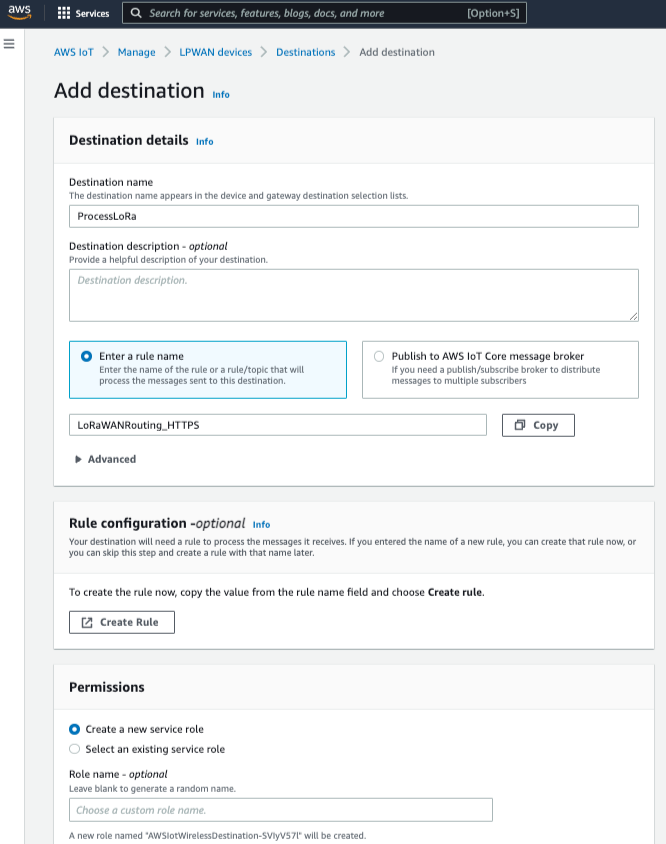
- Choose Add Destination
- On the Add destination page, enter "ProcessLoRa" as the Destination name
- Choose "Enter a rule name" and For Rule name enter "LoRaWANRouting_HTTPS".
- NOTE: The Destination name can be anything. For getting started and consistency, choose ProcessLoRa for the first integration with AWS IoT Core for LoRaWAN.
- We will be using this name in next step to set up the message routing
- Under Destination details , and an appropriate description under Destination description – optional.
- Ignore the section Rules configuration – Optional for now.
- Permissions - Select the "Create a new service role", AWS will automatically configure required permissions.
- Click "Add Destination". You will see a message “Destination added”, indicating the destination has been successfully added.
# Message route to Radio Bridge Console
- Now you need to configure the Message routing to forward the messages to console.
- Navigate to the AWS IoT Core console. In the navigation pane, choose Message Routing, and then Rules, Click "Create Rule".
- Enter rule name as "LoRaWANRouting_HTTPS", Click "Next".
- Note: This is the same name that we used to set up the "Rule name" in destination set up in previous step.
- Enter following "Sql Statement"
SELECT * FROM 'iot/topic' - Click "Next" to go to Step 3 - Attach rule actions.
- In the Rule action, choose the "HTTPS endpoint" and fill in the form as shown below.
- You can grab the HTTPS endpoint and Authorization token from Radio Bridge Console -> Integrations -> AWS IoT Core -> Uplink API Settings
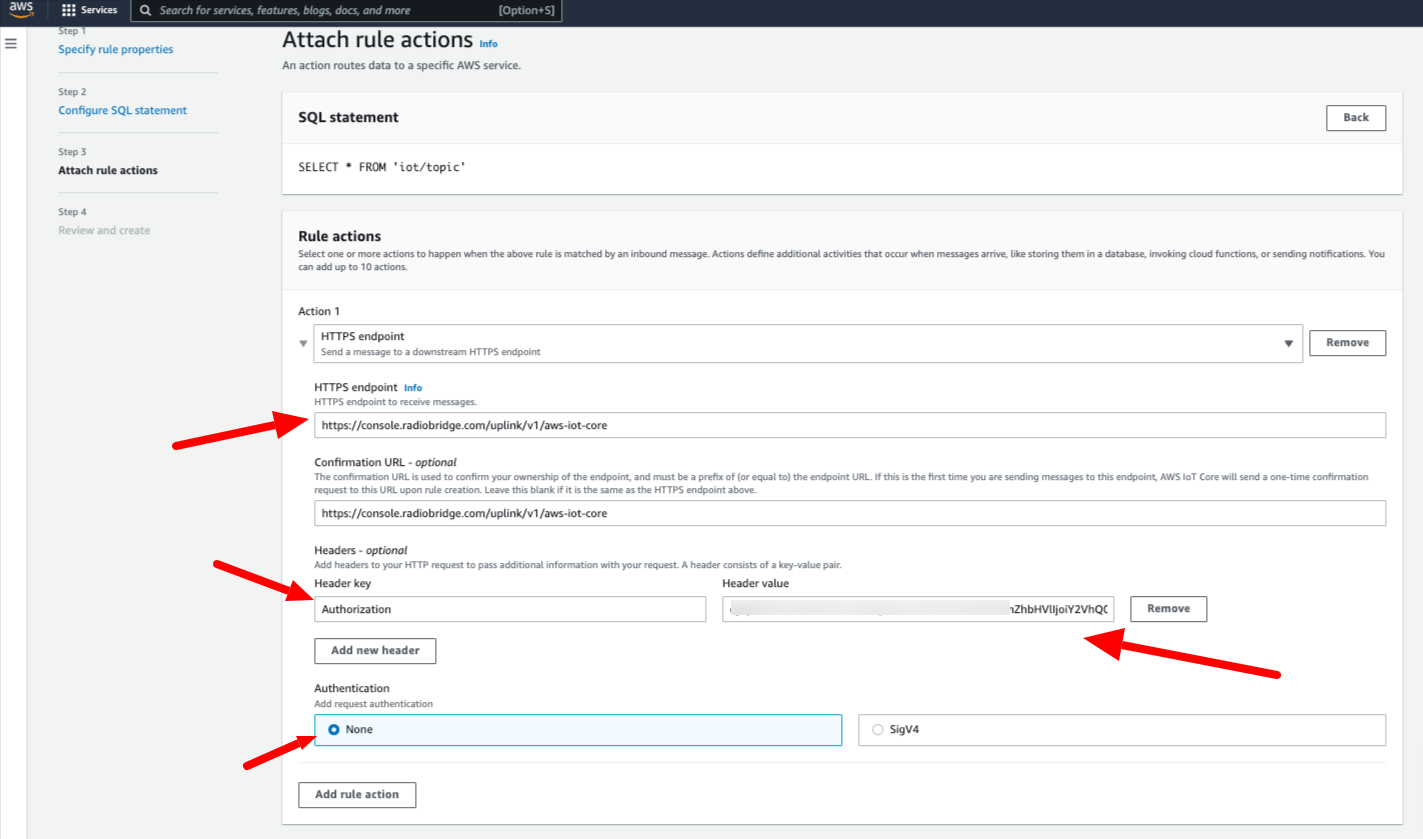
- Click "Next" to review the rule and finally click "Create"
# Destination activation
- Onse you will configure routing a destination will be setup to the Radio Bridge Console endpoint.
- Endpoint verification will happen automatically from console. though you will need to manually activate the destination.
- Navigate to the AWS IoT Core console. In the navigation pane, choose Message Routing, and then Destinations, follow below screenshot.

# Integrate your AWS account with Console
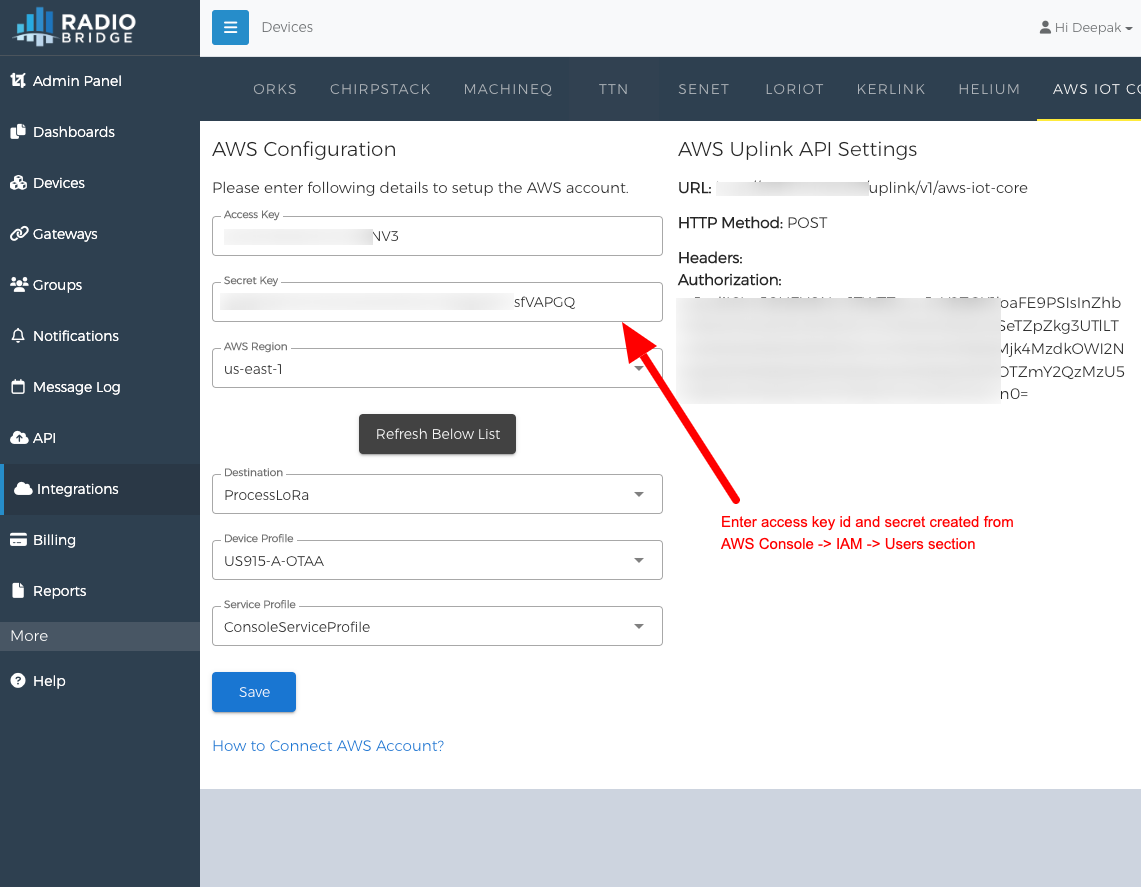
- Navigate to Radio Bridge Console -> Integrations
- Fill the Access key id and Secret that we generated earlier, For the region field we only support us-east-1 as that only region provides the Gateway management feature.
- Click "Refresh Below List" button to pull the dropdown values from your AWS account.
- Select the created Destination, Device profile and Service profile.
- Click "Save". It will display a successful message.
# Add Devices to Console
Your Radio Bridge Console should now be connected to your AWS account. When you add devices in the Console, select AWS IoT Core and then choose "Use Your Own Account" and fill the other information to add the device. Adding and deleting devices in the Console will now be reflected in your AWS account, and messages coming through AWS will appear in the Console.