# The Things Network (TTN)
The Things Network, also referred to as TTN, is a collaborative global LoRaWAN network. The TTN network server is located in the cloud and the gateways act as simple packet forwarders. Instructions for setting up a gateway and adding devices are provided on the website https://www.thethingsnetwork.org (opens new window) and are not repeated here.
WARNING
⚠️ Do not add devices to TTN directly. After this integration is set up, adding devices to the Radio Bridge console will automatically add devices to your TTN account.
This section describes the setup required to link your TTN account with the Radio Bridge Console.
# Register Through Radio Bridge
The easiest way to utilize TTN is to register your devices through Radio Bridge. In this case, it is not necessary to set up your own TTN account or set up any integrations in the Radio Bridge Console.
# Add Your Gateway
If there is TTN coverage in your area, it is not necessary to add your own gateway, but if adding coverage is necessary, this section describes the process to do so. Log into the Radio Bridge Console, select the Gateways tab on the left side, and click “Add Gateway”. Select the “TTN Gateway” from the listed network, fill in your Gateway EUI (Generally it’s your Gateway MAC ID with “00:00” inserted between the first three and last three bytes), select the appropriate frequency plan, and select the appropriate router zone.
Once the gateway is registered, you should see it in gateway list. Click the “Gateway Setup” link for the new gateway and note the gateway ID and gateway Key. This ID and Key need to be added to your gateway to complete the link. Once this is done you should see a connected status on the Console as well as within your gateway.
# Add Devices to Console
When you add devices in the Console, select The Things Network, select the option to use the Radio Bridge account, and add the device.
# Connect your own TTN Account
If you already have a TTN account and wish to connect it to the Radio Bridge Console, follow the steps in this section.
# Create a New Application on TTN
In your TTN console, go to Applications -> add application. Make sure you change your Application EUI to the Radio Bridge AppEUI (see section on AppEUI/JoinEUI above). If this Application EUI is not set, it won’t link correctly to the Radio Bridge console.
# Create API Key on TTN
Go to your application on TTN and select API Keys -> Add API Key. Name the new key “console” and select: Grant all current and future rights. Click Create API key.
# Add Integration to the Console
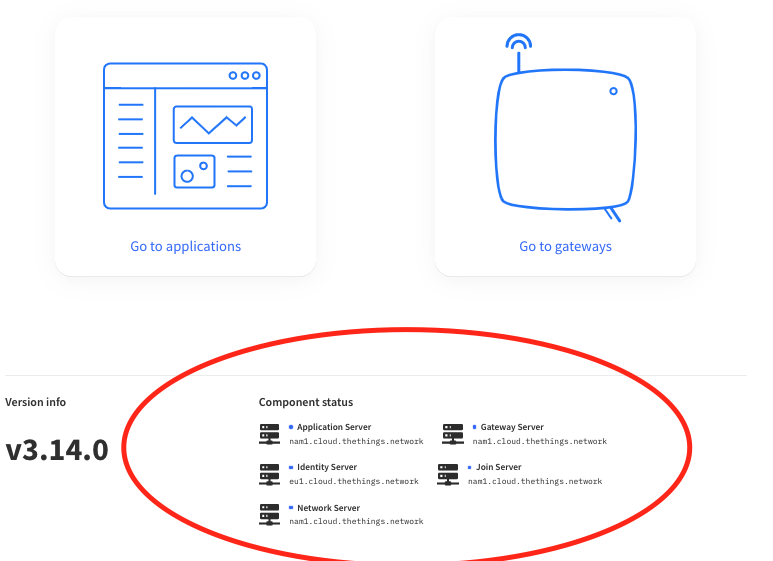
Go to the Radio Bridge Console and select the Integrations tab -> The Things Network. Add the TTN application ID to the Application ID field and the API key generated in the last step to the API Key field. Note that the Application API Key is not the name of the key, but the randomly generated string that was created. You will need to enter the Application server, Gateway Server, Identity Server, Join Server and Network server host address. You can find these on the TTN Home page (Check below screenshot). Click Update.
# Add Integration to TTN
Go to the TTN application and select Integrations -> Webhooks -> Add Webhook. Enter the fields as shown in the following table.
Table 4: Parameters for TTN integration
| Parameter | Description |
|---|---|
| Webhook ID | Enter any name |
| Webhook Format | JSON |
| Base URL | Use the URL from the TTN tab on the Radio Bridge Console |
| Method | POST |
| Downlink API key | Leave this field blank |
| Additional headers | |
| Authorization | Use the Authorization Value from the TTN tab on the Radio Bridge Console |
| Enabled messages | |
| Uplink message | Tick and leave the path field as blank |
# Add Devices to Console
Your Radio Bridge Console should now be connected to your TTN account. When you add devices in the Console, select The Things Network and add the device. Adding and deleting devices in the Console will now be reflected in your TTN account, and messages coming through TTN will appear in the Console.