# MachineQ
machineQ is a LoRaWAN connectivity service from Comcast. The machineQ network server is located in the cloud, and the machineQ gateways forward packets between the network server and the LoRaWAN sensors. There is no configuration required on a machineQ gateway, just plug it in and it is ready to go.
# Registering Devices through Radio Bridge
The easiest way to add machineQ devices is to let Radio Bridge register them for you. In this scenario, you don’t need your own machineQ account or a direct engagement with machineQ. Also, there is no cost associated with registering through Radio Bridge.
Simply log into the Radio Bridge console and select the Devices tab on the left side of the page and click “Add New Device”. From there select the machineQ icon and then “Register through Radio Bridge”. Once the device has been added, you will see sensor messages appear in the console.
# Using Your machineQ Account
If using your own machineQ account is required, this section shows how to link your machineQ back end to the Radio Bridge Console.
# Create the Output Profile
Go to the Radio Bridge console, select Integrations along the left and then machineQ along the top. The three settings under “machineQ Output Profile Settings” including the URL, TokenType, and TokenValue will be used in the machineQ backend setup.
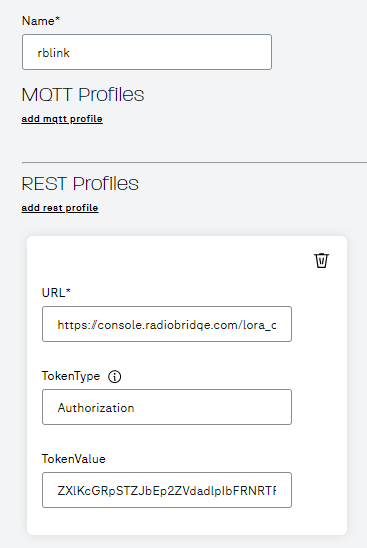
In the machineQ backend, go to the Integrations tab on the left, select “Output Profiles” along the top, and then click “Add Output Profile”. Under REST Profiles select “add rest profile”. Provide a name for the output profile and then enter the URL, TokenType, and TokenValue from the Radio Bridge Console as shown below.
Click Submit to create the new profile.
# Create the Application
On the machineQ window and select Integrations -> Application Management and then Get Started. Give the application a name and hit start. Copy the Client ID shown and paste into the client ID field on the Radio Bridge Console. Click next and do the same for the client secret. Hit done inside of machineQ and the application will be created.
Back in the Radio Bridge Console, click on “Refresh Dropdowns” and you will see the output profile displayed as shown below.

For the Decoder Type select “Unknown” and for Device Profile select “LoRaWAN-1.0.2-class A-FCC-20dBm”. Service profile should be on “default”. Click Update, and if everything was set up correctly you will get a message saying that the account detail has been saved. You can now add devices and see the uplink messages come through your machineQ backend account and up to the Radio Bridge Console.
# Bypassing the Radio Bridge Console
If the Radio Bridge console is not used, and sensor messages will be sent directly from the end customer’s machineQ account to a third-party application, please refer to the table below for the parameters required to add the device to the machineQ back end.
Table 5: Parameters for machineQ Setup
| Parameter | Description |
|---|---|
| Dev EUI | The Device EUI listed on your sensor |
| App EUI | See section on AppEUI/JoinEUI above |
| App Key | Enter the Key listed on your sensor |
| Device Profile | LoRaWAN 1.0.2 Class A 20dBm |
| Decoder Type | Use “Unknown” |
| DevAddr Assign | Dynamic |
# Add Devices to Console
Your Radio Bridge Console should now be connected to your machineQ account. When you add devices in the Console, select machineQ and add the device. Adding and deleting devices in the Console will now be reflected in your machineQ account, and messages coming through machineQ will appear in the Console.