# Chirpstack
ChirpStack is an open source LoRaWAN network server that can be deployed by end users who wish to maintain their own private installation. You can register devices through the Radio Bridge ChirpStack installation, or you can connect your own ChirpStack installation to the Radio Bridge Console. Both methods are described below.
# Using the Radio Bridge ChirpStack Server
The easiest way to use ChirpStack is to let the Radio Bridge console provision the device to the Radio Bridge ChirpStack server. In this scenario, you don’t need to install your own ChirpStack network server.
# Configure the ChirpStack Gateway
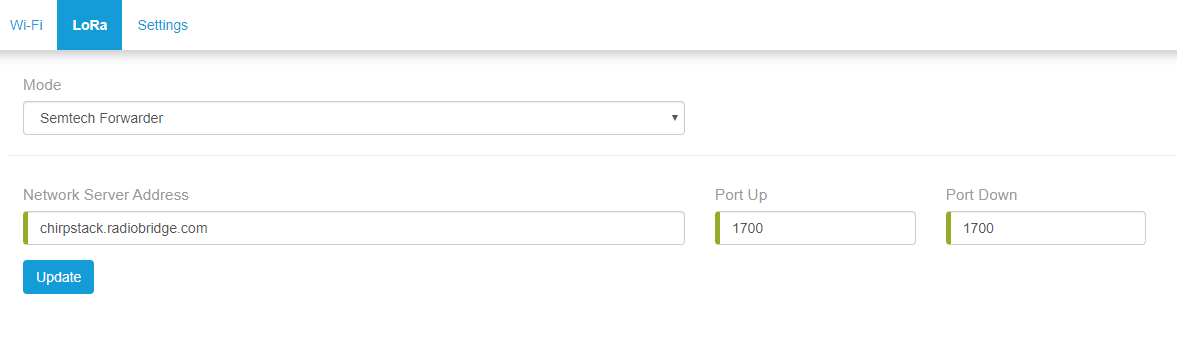
You will need to set up a gateway to direct LoRaWAN traffic to the Radio Bridge ChirpStack server. To do so, set the gateway to use the basic Semtech packet forwarder and point it based on the network region EU or US as shown in the screenshot below.
- US: IP address chirpstack.radiobridge.com port 1700 .
- EU: IP address chirpstack.eu.radiobridge.com port 1700 .
# Add the ChirpStack Gateway to the Console
Go to the Gateways tab on the left, click Add New Gateway, and select ChirpStack.
Enter a name, Gateway EUI, Region, and the description. Note that the Gateway EUI is often the MAC address with 0xFFFF as the middle two bytes. For example, if your 6-byte MAC address is 0x010203040506, then the 8-byte Gateway EUI may be 0x010203FFFF040506.
# Add Devices to the Console
Select the Devices tab on the left side of the page and click “Add New Device”. From there select the ChirpStack icon and then “Register through Radio Bridge”. Once the device has been added, your Radio Bridge sensors will connect through the ChirpStack network and you will see new messages appear in the console.
# Using Your ChirpStack Server
If you wish to use your own ChirpStack network server, this section shows how to link your ChirpStack back-end to the Radio Bridge Console.
# Configuring HTTP Integration in ChirpStack
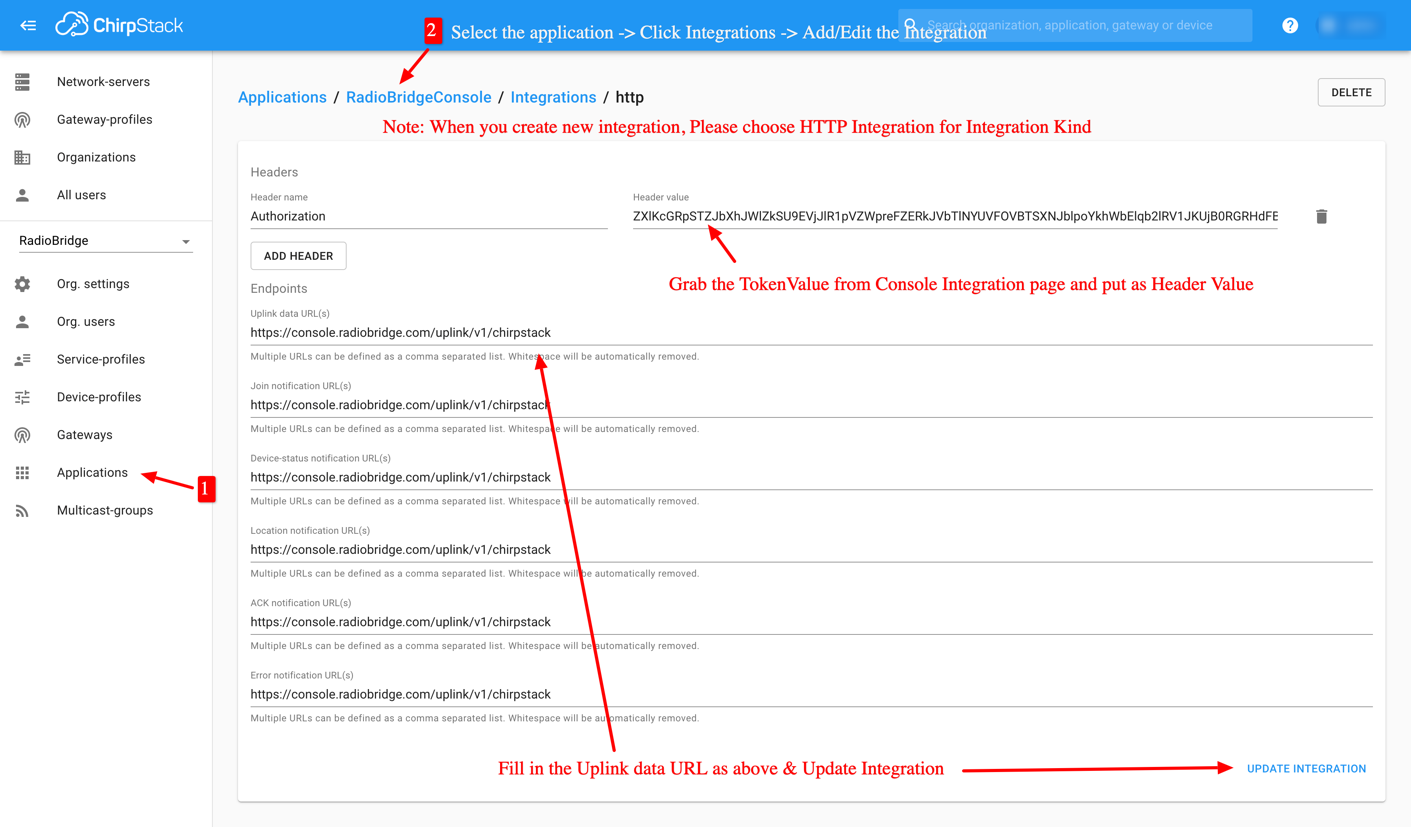
The first step is to configure the HTTP Integration to forward messages from your ChirpStack application server to the Radio Bridge Console. The image below illustrates the steps to configure HTTP Integration from the ChirpStack server:
- Click Applications. Each application contains separate HTTP integrations, so click on the application which you want to use with Radio Bridge
- Go to the Integrations tab and click the Create button.
- Click the
Add Headerbutton to add the Authorization header. - The Header value should be filled in with the TokenValue generated from the Radio Bridge Console as shown in the next section.
- Fill in the URL fields with the URL provided in the Radio Bridge Console as shown in the next section.
- Once done, click Update Integration to save.
See the screenshot below. Notice that the Header Value and the URLs come from the Radio Bridge Console as shown in the next section.
The Radio Bridge Console is now linked to the ChirpStack server. When adding a new device, select ChirpStack and “Use Your Own Account”.
# Configuring the Integration in the Radio Bridge Console
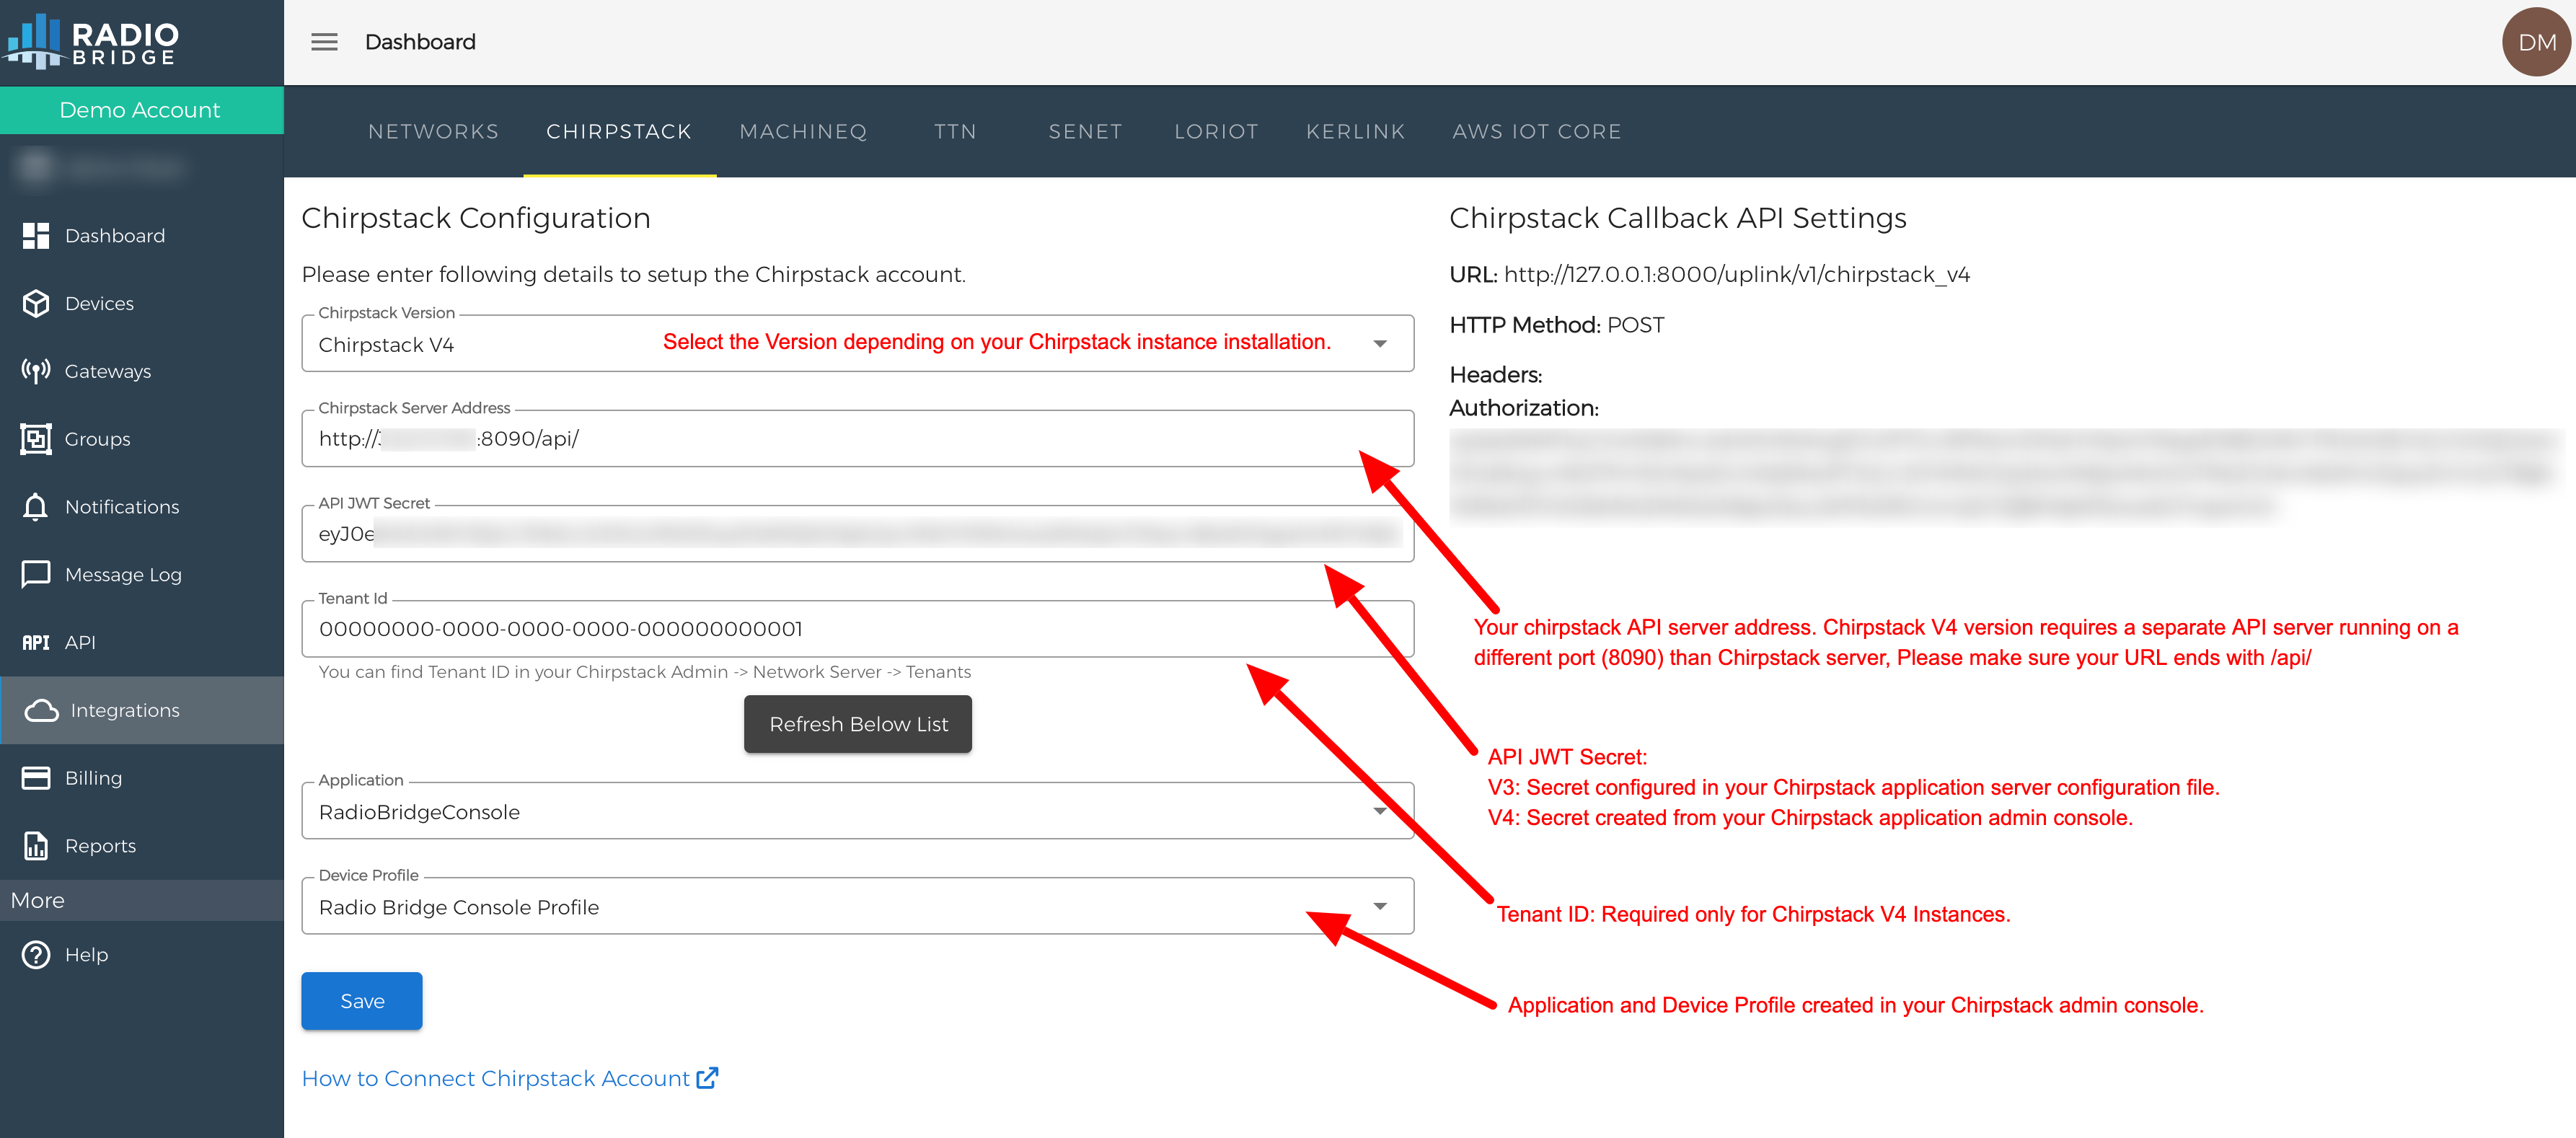
The image below illustrates the steps to configure HTTP Integration from the Radio Bridge Console:
- Go to the Integrations tab and click the Chirpstack tab. Next screen will show the Chirpstack connect form where you need to fill various required details to connect your Chirpstack instance with Console.
- Select the Chirpstack version depending on your instance installation.
- Enter the URL of the ChirpStack server into the field “ChirpStack Server Address”, Make sure url ends with "/api/".
e.g. https://yourchirpstackserver.com/api/
- For the Chirpstack V4 instance, You will need to install the API server separately to connect with your Chirpstack instance. Click here to read more (opens new window).
- The JWT Secret is a secret key that you can find in your Chirpstack admin console or Application configuration file depending on your Chirpstack instance.
- For V3 instance you can find it into the ChirpStack application server configuration file.
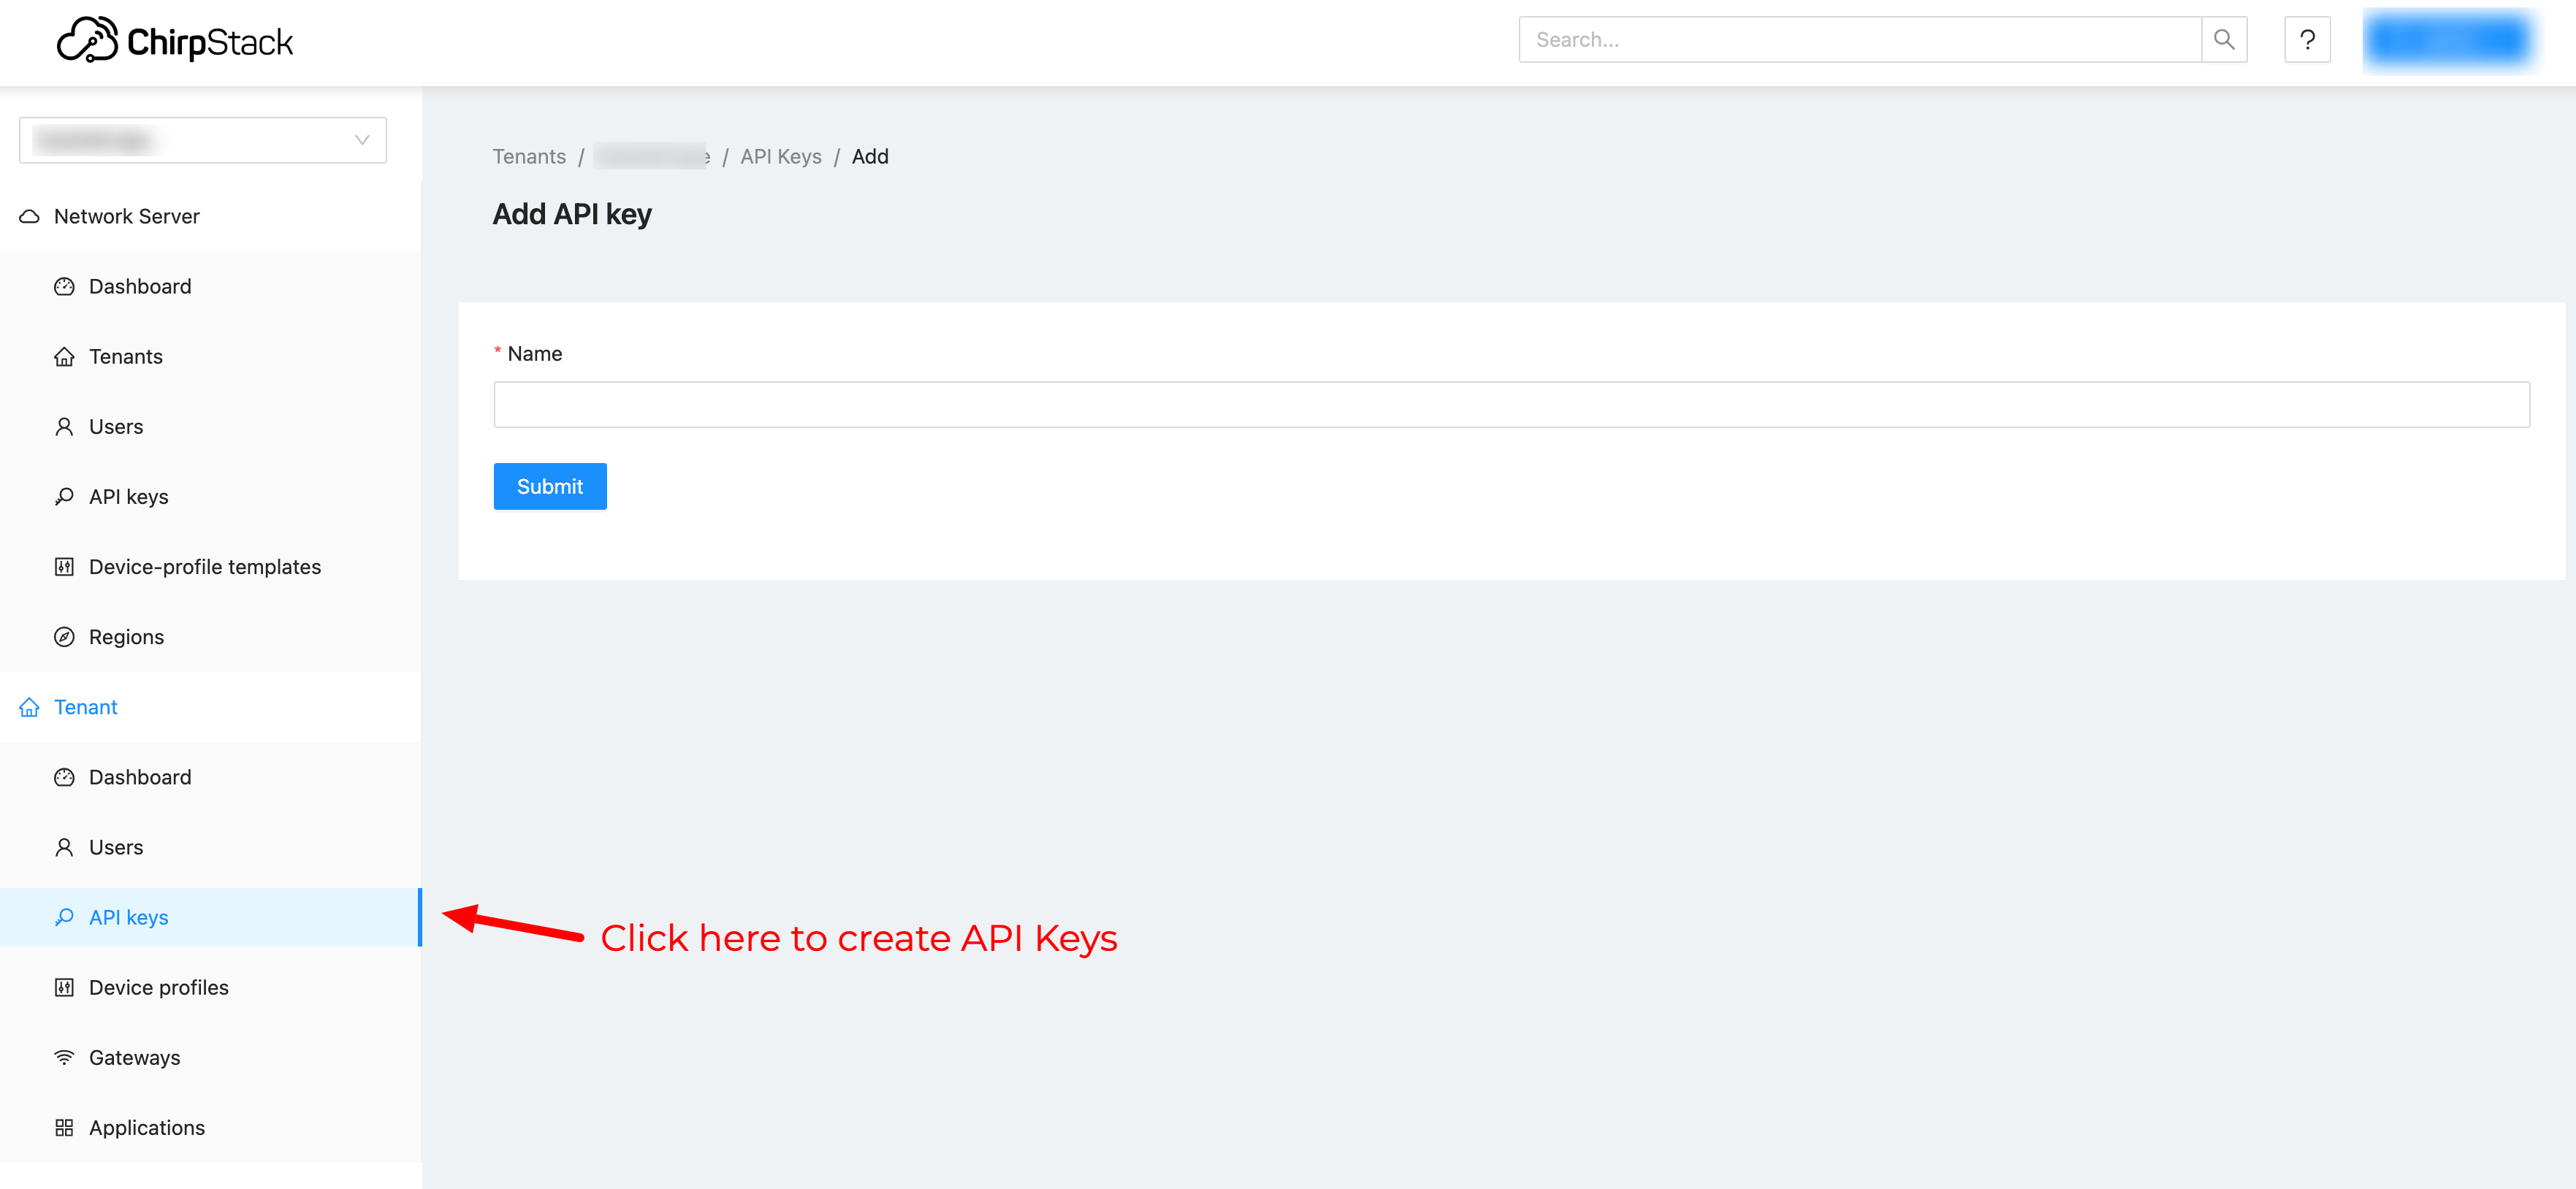
- For V4, You can create an API Key from your Chirpstack Admin Console.
- Required only for Chirpstack V4: Enter Tenant Id, which can be found on your chirpstack dashboard.
- Select the Application Name & Device Profile, If you do not see any option that's probably because your Chirpstack admin console doesn't have "Application" & "Device Profile" created.
- When complete, click Save.
The Radio Bridge Console is now linked to the ChirpStack server. When adding a new device, select ChirpStack and “Use Your Own Account”.
# Important notes for Chirpstack V4:
- Chirpstack V4 instance doesn't contain any packaged REST API server, so you will need to install it separately to communicate with Chirpstack REST APIs. Please follow below link to read more. https://www.chirpstack.io/docs/chirpstack/api/rest.html (opens new window)
- Chirpstack V4 instance doesn't require JWT Secret key for Rest API Authentication, Instead you need to create API key through Chirpstack application admin console.
- If you're not seeing events on RadioBridge Console then it might be due to incorrect Uplink API configuration in your Chirpstack Admin Console -> Application -> HTTP Integration configuration. For Chirpstack V4 instance you can get correct API Url on RadioBridge Console -> Integrations -> Chirpstack page (Notice the Uplink Url is different for Chirpstack V3 and V4 instances).
# Update Your Chirpstack Server Settings
The ChirpStack network server does not have the 500kHz channels enabled by default, and this is required for Radio Bridge sensors to communicate with data rate 4 (DR4). If ChirpStack is not updated to include this, messages may be lost.
To update your ChirpStack server, please do the following:
- Log into your network server using SSH
- You can find the Chirpstack configuration file in the folder /etc/chirpstack-network-server/chirpstack-network-server.toml
- Enter the command below to edit the above file sudo nano /etc/chirpstack-network-server/chirpstack-network-server.toml
- In the editor find the line enabled_uplink_channels
- For the US region: enabled_uplink_channels= [0, 1, 2, 3, 4, 5, 6, 7, 64]
- For the EU region: enabled_uplink_channels= [0, 1, 2, 3, 4, 5, 6, 7]
- Replace the above line with enabled_uplink_channels=[]
- Save the file and restart the network server using the command below: sudo systemctl restart chirpstack-network-server